🔥Let's Do DevOps: Bootstrapping Azure Cloud to Your Terraform CI/CD
This blog series focuses on presenting complex DevOps projects as simple and approachable via plain language and lots of pictures. You can do it!
Pairing Terraform with a CI/CD like Azure DevOps, Terraform Cloud, or GitHub Actions can be incredibly empowering. Your team can work on code simultaneously, check it into a central repo, and once code is approved it can be pushed out by your CI/CD and turned into resources in the cloud.

When you start rolling this out, you run into an immediate catch22 — you need a storage container to store the remote state in order to run terraform, but you need to run terraform in order to build these resources.
The best method I’ve found to get around this problem I’m calling “pivoting”. The basic order is:
Run terraform from your local machine, and build the required remote resources.
Tell terraform to use the remote state storage, then push your local .tfstate to the remote storage.
Upload your terraform to the CI/CD, where it can access its state file and start building other cool things.
Let’s walk through the steps, and you’ll have an Azure account bootstrapped into your CI/CD before you can say “terraform can do that?”
Active Directory In the Cloud: Create a User
If you thought, like me, that migrating to an all-cloud Azure environment would let you get away from interacting with Microsoft’s Active Directory, you and I were both incorrect. The Azure cloud is deeply tied to Active Directory, and Microsoft presents it to you in a blade called “Azure Active Directory”.
Permissions for users and devices are managed here, so let’s start in the Azure Active Directory blade.
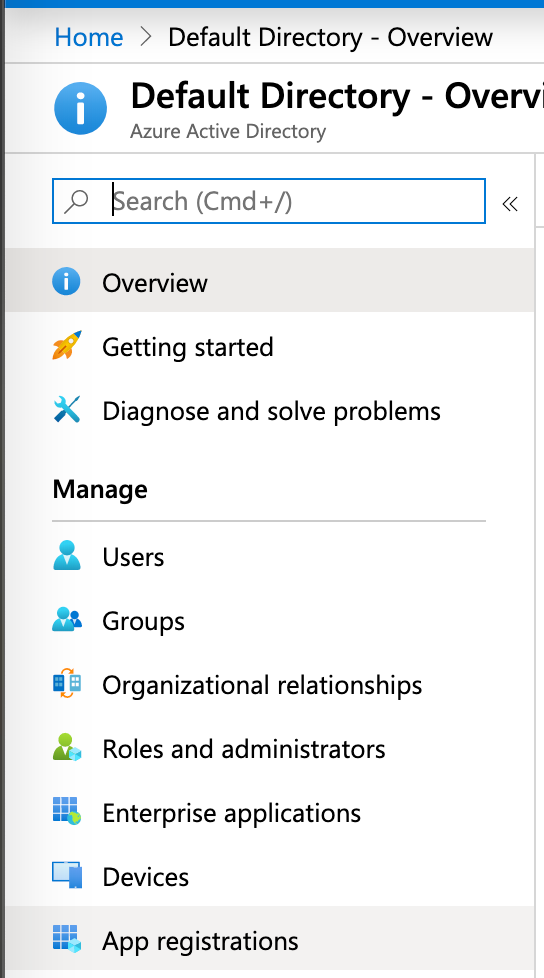
Along the left column, you’ll see all sorts of familiar active directory names. A local AD admin would call the functionality we’re looking for a “service account”. Because in the cloud we rename things, Azure calls this functionality an “App Registration”.
Regardless of what we call this function, it’s a user account in active directory that’s authenticated to by an application. That application will be authorized to do all the stuff we permit this App Registration account to do.
Look for “App Registration” in the left column and click on it.
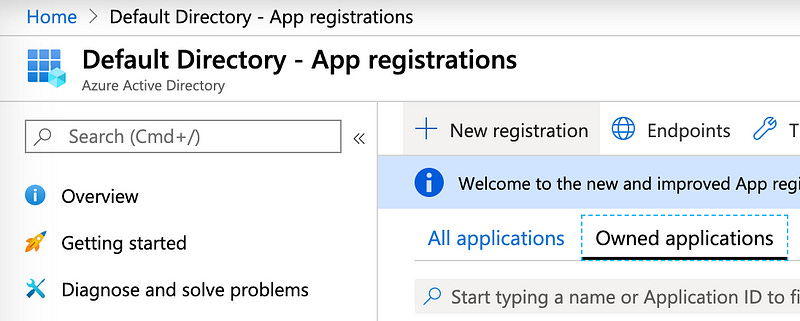
In the top left of this panel, click on “New registration” to create a new App Registration.
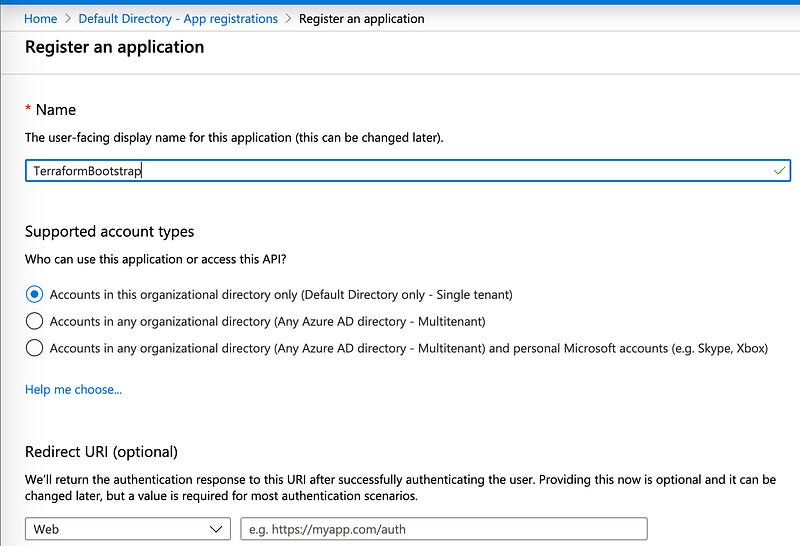
We need to name the application, so I’ll call it “TerraformBootstrap”. We only have a single active directory in our lab, so leave the “Supported account types” as the default. And we don’t need a Web Redirect URI, so leave that blank. Hit the “Register” button at the bottom left.
The App Registration will be built in just a few seconds. Take note of the Application ID and the Directory ID. Copy these values out to a notepad, we’ll need to use them later.
Active Directory In the Cloud: Create a Password
That Directory ID and Application ID are basically the map coordinates and username of the account we’ll be using. You might have noticed we don’t have a secret/password yet — that’s our next step.
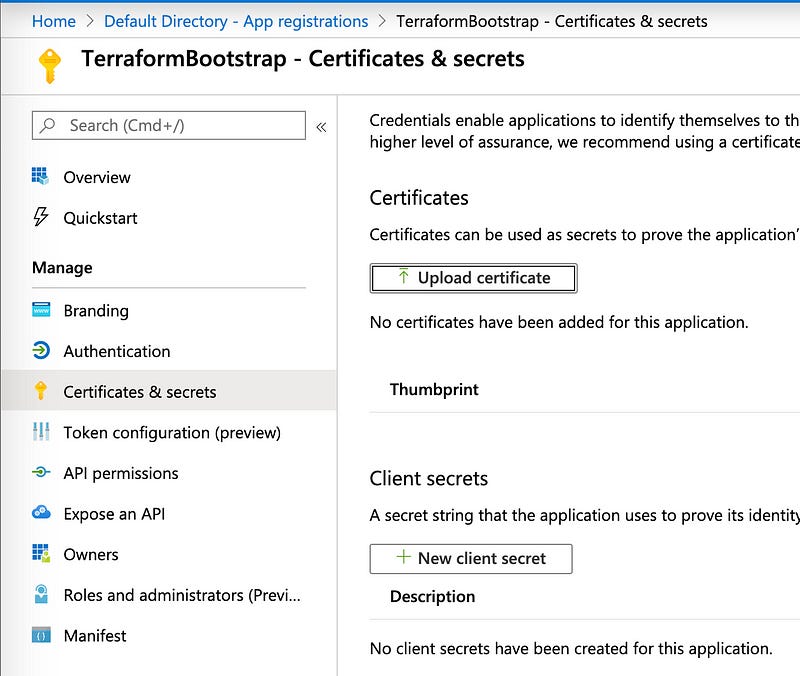
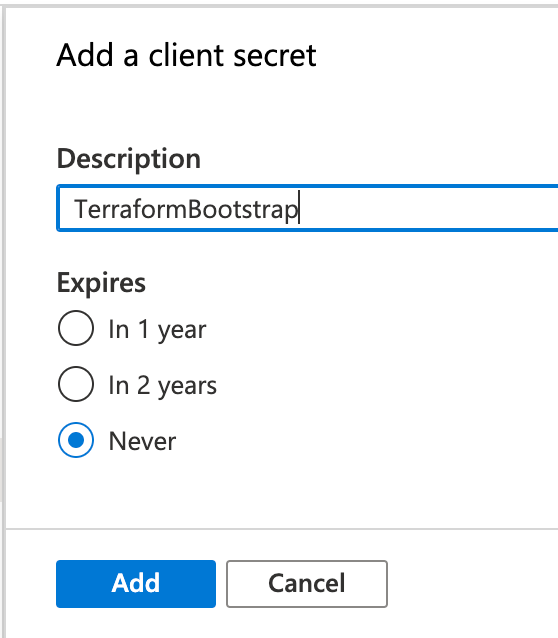
In the left column, click on “Certificates & Secrets” and then on “New client secret” button.
You’ll give your secret a name. If you’re using this secret for a particular server or application, that’s a great start. I’m doing this in a lab, so I’ll call mine “TerraformBootstrap”. You also choose how long until this particular secret expires. I’ll set “Never”, but choose what’s right for you.
Hit “Add” to build the secret.
A secret is generated and listed under “Value”. Also copy this value out to a notepad, and keep track of each — we’ll need to use this in a minute.
Warning: The information we’re preparing can be used to authenticate to your environment and do stuff that could cost you money. Don’t share this secret or check it into source control. Cloud providers might hold you liable for what anyone does in your account if you share a secret on accident.
One More Value: Subscription ID
The last value we need to authenticate to this account with terraform is the subscription ID.
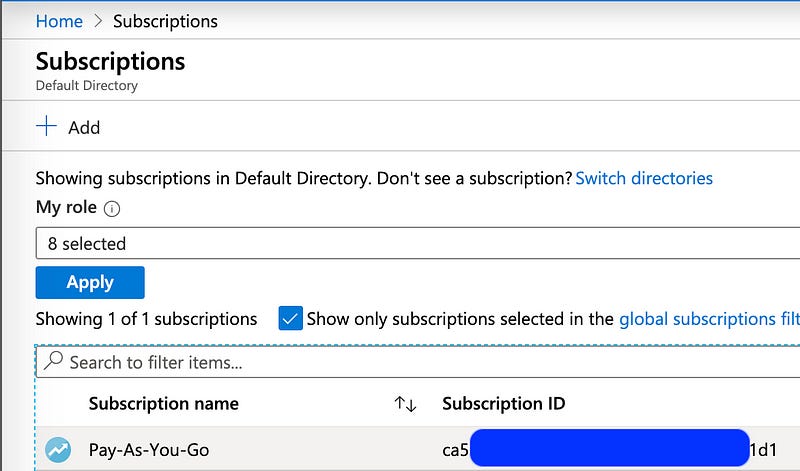
If this is your personal account, it’s likely your subscriptions page looks like mine — you have only a single account listed, with a single subscription ID. Copy out this value. It’s not terribly sensitive, but still a good idea to not share unless you need to.
Authorization: What Are We Allowed to Do?
We now have an App Registration user that we can authenticate as, and it’s allowed to do… well, nothing. We haven’t given it any authorizations, so its permission set is empty. Let’s fix that.
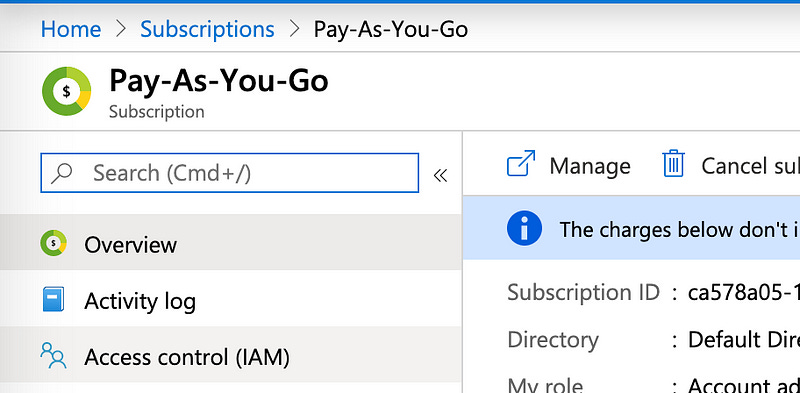
Click on the subscription’s line to open it up.
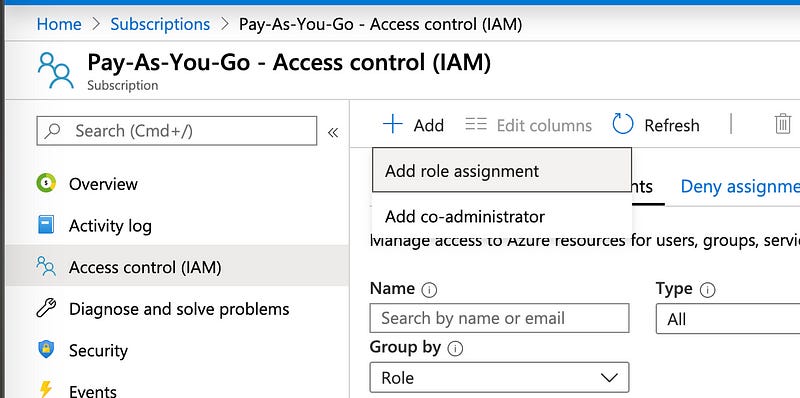
Find the “Access control (IAM)” entry in the left column and click it. Then click “Add” in the top right and hit “Add role assignment”.
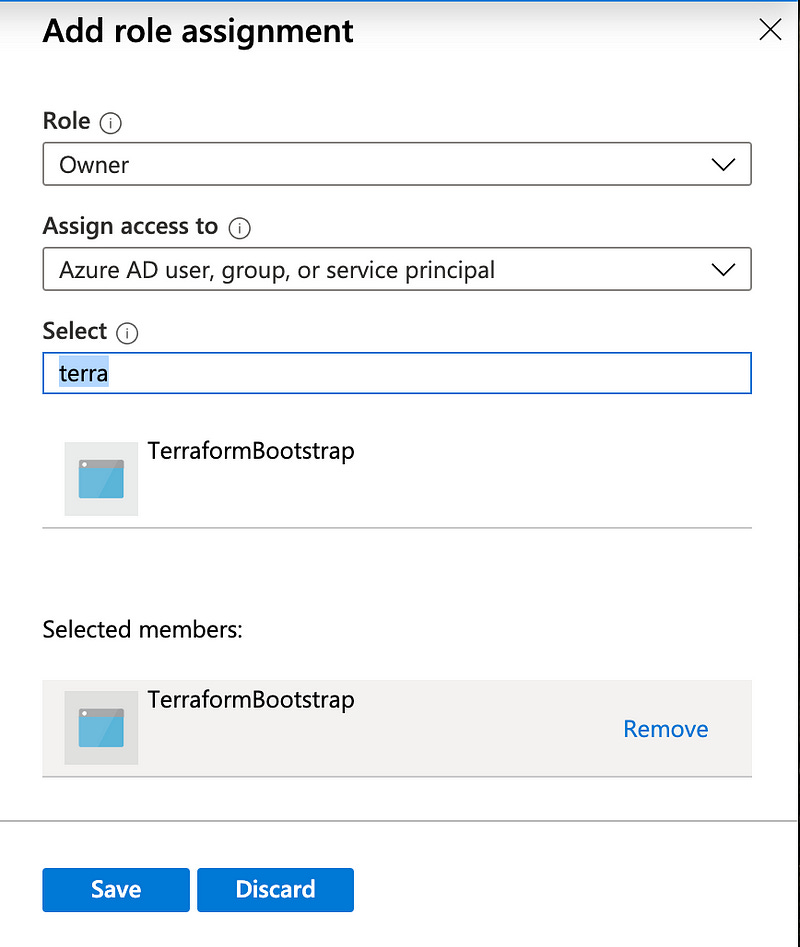
I want this terraform user to be able to do anything and everything, so the role I’ll choose is “Owner”. Note that this is a terrible enterprise practice. In a real enterprise environment, you’d create a role for Terraform and only give it the ability to create/edit/delete specific resources in specific resource groups. But that’s beyond the scope of this guide today.
We created our user in the Azure AD, so leave “Assign access to” as the same. Under the “Select” box, type a few characters and then look for the App Registration user we created and click it. Then click “Save” to apply the permissions.
Great, now our App Registration entity has access to do whatever, and we have the info to authenticate from a CLI anywhere into that user and do stuff with terraform. Let’s move to our local computer and start doing that!
Set CLI Environment Values for Terraform to Consume
Terraform will automatically read specific global environment variables if they’re present in the terminal terraform runs in, which is exactly our plan. Refer back to the values you’ve been keeping track of. We’re going to export these values into our terminal with specific names Terraform looks for:
ARM_SUBSCRIPTION_ID: This is the subscription ID we looked up just above.
ARM_CLIENT_ID: This is the “Application (client) ID” under the App Registration entry we created.
ARM_TENANT_ID: This is the “Directory (tenant) ID” under the App Registration entry we created.
ARM_CLIENT_SECRET: This is the secret/password we generated.
Take that information and format it like the following. This is the block you’ll paste into your terminal that lets Terraform build stuff.
| export ARM_SUBSCRIPTION_ID="ca578a05-xxxx-xxxx-xxxx-5b491d1" | |
| export ARM_CLIENT_ID="746a3efxxxx-xxxx-xxxx-xxxxe7408f24" | |
| export ARM_TENANT_ID="722653a2xxxx-xxx-xxxxx-xxxxe05032345" | |
| export ARM_CLIENT_SECRET="J8hwUxxx-xxxx-xxxx-xxxxtQJG8r0S4/T.I" |
Export those values into your local terminal. I’m on a mac, so exporting will look a little different on a windows computer (but will look the same on *nix boxes).
Time to Build Our Remote State.
The first thing to remember about CI/CDs is that builders are generally transient, and run lots of jobs. Plus we sometimes don’t control the builders that execute this code, and the terraform state file is just full of (unencrypted) secrets, so it doesn’t do to put it on a remote box. We really should store the terraform state file somewhere in our infrastructure where we can protect it and let any builder anywhere access it if they need to.
So we need to build some stuff. I have written our some terraform code that’ll build us what we need in Azure. You can find the source code here:
KyMidd/Azure_TerraformBootstrap
You can't perform that action at this time. You signed in with another tab or window. You signed out in another tab or…github.com
But let’s break it down here for what we’re doing. First, we establish our providers. We’ll need to build things in Azure using the AzureRm provider, so we call it and set a base-line version, which is the newest available. It’s a good idea to establish a minimum version.
Then we call terraform and establish the same with the version we’ll run. Note that there is a “backend Azurerm” block that is commented out. Leave that commented out for now. Once we’ve built the remote state storage, we’ll uncomment it so terraform knows where to look for the remote terraform state file.
| # Establish the baseline version for AzureRM provider or newer | |
| provider "azurerm" { | |
| version = "~> 1.39.0" | |
| } | |
| # Establish terraform baseline version or newer | |
| # Also tell terraform to use a remote backend to store to and fetch from for state file storage | |
| terraform { | |
| required_version = ">=0.12.18" | |
| /* Leave this part commented out until you've created the storage. Otherwise, Terraform will fail to run (and build your storage!) | |
| backend "azurerm" { | |
| resource_group_name = "KylerResourceGroup" | |
| storage_account_name = "kylerstorageaccount" | |
| container_name = "terraform-state-container" | |
| key = "terraform.tfstate" | |
| } | |
| */ | |
| } |
Then we build a resource group. In Azure, every resource belongs to a resource group. Policies and permissions can be assigned against resource groups, so it helps to organize and manage resources in an efficient way.
| # Build a resource group to put objects in. Used for organization | |
| resource "azurerm_resource_group" "resource_group" { | |
| name = "KylerResourceGroup" # This is the resource_group_name value in the terrafrom backend block above above | |
| location = "eastus" | |
| } |
Then we need to build some resources. The first task we need to build is a storage account. This is equivalent to an S3 bucket in AWS-land. We give it a name which has to be globally unique. Azure has annoying required us to use only lower-case (no camel-case) letters and numbers (no snake-case) and no spaces for the name, meaning every AzureRM storage account name is difficult to read. Make sure to update this name to be unique to you — I generally use my name to help unique-ify it.
We also build a storage container which is sort of like a folder tree or file-share that we’ll dedicate to terraform storage. This name has more restrictions for no reason I can figure out, but at least we can use hyphens. This one only has to be unique within the storage account.
| resource "azurerm_storage_account" "storage_account" { | |
| # Name can only consist of lowercase letters and numbers, and must be between 3 and 24 characters long | |
| name = "kylerstorageaccount" # This is the storage_account_name value in the terraform backend block above | |
| resource_group_name = azurerm_resource_group.resource_group.name | |
| location = azurerm_resource_group.resource_group.location | |
| account_tier = "Standard" | |
| account_kind = "StorageV2" | |
| account_replication_type = "LRS" | |
| enable_https_traffic_only = true | |
| } | |
| resource "azurerm_storage_container" "storage_container" { | |
| # Name must be lower-case characters or numbers only. No hyphens, underscores, or caps. | |
| name = "terraform-state-container" ## This is the container_name value in the terraform backend block above above | |
| storage_account_name = azurerm_storage_account.storage_account.name | |
| } |
That’s all we need for now. Let’s run some Terraform!
Terraform: Let’s Do This
We’re ready to run terraform and deploy these resources. If you haven’t copied down the base Terraform code from my GitHub, please do. Then navigate your terminal to the location the code is stored and run terraform init. If you see “successfully initialized” things are going well for you.
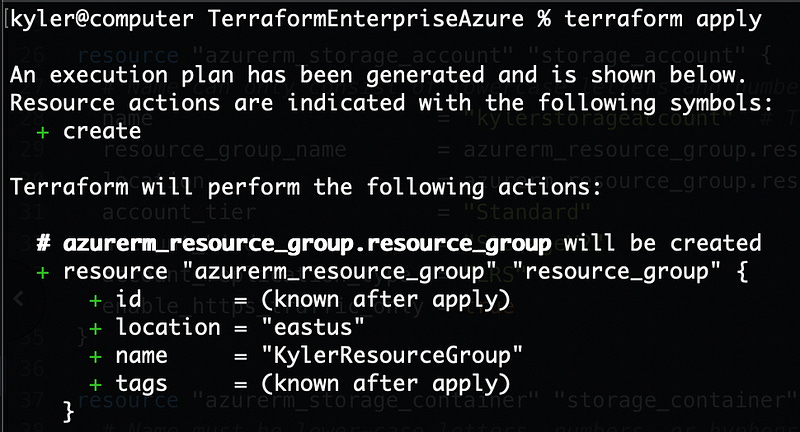
If you see green, run a terraform apply to tell terraform to create a plan and get ready to build.
You should see a bunch of responses, then a plan at the bottom and terraform waiting for you to approve. Key inyes and hit enter.
Hopefully, you see that 3 resources were successfully added. If you see any errors, read closely. In my experience terraform is highly verbose in returning error messages. The most likely problem is you chose a non-unique name for your storage account. Update the name in your file, save, and re-run terraform apply.
Pivot Local Config to Remote Storage
“Pivot!” Ross from Friends
Now the remote state is ready, so let’s update our terraform remote-state block to use it. Remove the /* and */ around the “backend” block in the terraform block. Once done it should look like the following. Make sure to update the resource group, storage name, and containers to be the same as you just built!
| terraform { | |
| required_version = ">=0.12.18" | |
| backend "azurerm" { | |
| resource_group_name = "KylerResourceGroup" | |
| storage_account_name = "kylerstorageaccount" | |
| container_name = "terraform-state-container" | |
| key = "terraform.tfstate" | |
| } | |
| } |
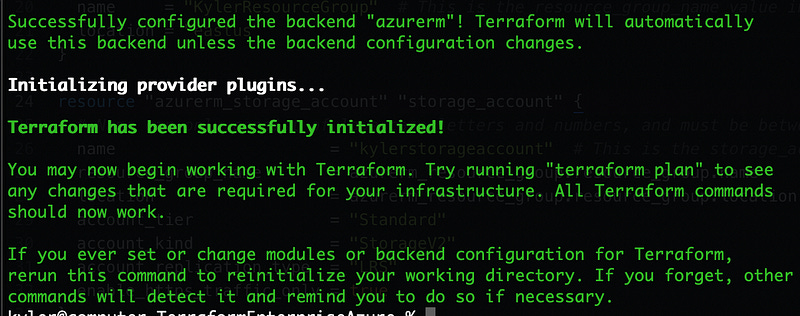
Save the file and then run terraform init again. If all goes well it’ll notice the changes and tell you it can copy the local state file to the remote state. That’s exactly what we want, so answer yes and hit enter.
If all goes well, you’ll see a lot of green:
Destroy your Resources To Save Money
An optional step if you’re going to step away from your config for a while (work, school, life), is to destroy the resources terraform has built.
If you want to save some money, remember to destroy your resources instead of letting them sit. First, comment out the “backend “azurerm”” block once more and then run terraform init (answer yes), then terraform destroy and again answer yes. Terraform will destroy all the resources you created, and Azure won’t bill you for the usage.
Don’t worry, you can always build them again later.
Now for the REALLY cool stuff
Great, now we have all the items done we need to build our CI/CD and integrate it with Azure. You’ll be able to run the same terraform configuration anywhere — remember to export the values into the CLI and have the “backend” configuration in Azure and terraform can be run from anywhere.
A common pattern is to upload this configuration to GitHub or another storage location, then tell the CI/CD to watch it for changes. When you upload a new resource, the CI/CD will notice, and execute the changes for you, using the authentication user and authorization permissions you gave it. We’ll cover that better in future blogs.
Good luck out there.
kyler


