
🔥Building a Slack Bot with AI Capabilities - From Scratch! Part 5: RAG with Confluence Knowledge Base🔥
aka, please read ALL my docs

This blog series focuses on presenting complex DevOps projects as simple and approachable via plain language and lots of pictures. You can do it!
These articles are supported by readers, please consider subscribing to support me writing more of these articles <3 :)
This article is part of a series of articles, because 1 article would be absolutely massive.
Part 1: Covers how to build a slack bot in websocket mode and connect to it with python
Part 4: How to convert your local script to an event-driven serverless, cloud-based app in AWS Lambda
Part 5 (this article): Building a RAG Knowledge Base of an entire Confluence wiki, and teaching our Slack Bot to Read it in RealTime
Part 7: Streaming token responses from AWS Bedrock to your AI Slack bot using converse_stream()
Part 8: ReRanking knowledge base responses to improve AI model response efficacy
Part 9: Adding a Lambda Receiver tier to reduce cost and improve Slack response time
The response to this series from you readers (and from my coworkers to this tool) has been tremendous, so I’m going to keep building it out. Your subscriptions (and if you’re a paying subscriber, your dollars for caffeine), power me to write all these. If you don’t subscribe, please consider doing so. It means the world to me :D
Hey all!
In this series so far, we’ve established a Slack App (that we call @Vera), which sends a webhook to an AWS Lambda running Python 3.12. It reads the Slack thread, and constructs a conversation for Claude Sonnet v3, which is running in serverless mode on AWS Bedrock. We built guardrails, all the python, all the things.
It’s amazing, and it works, and our users love it. And then they ask:
Can you have this bot read our internal docs?
And that’s a great question, right? Wouldn’t it be amazing if this great AI bot had read all your internal docs and could have a conversation with you on it? Even better if it could link you to the relevant docs so you could read further?
Well, you can do that! There’s a couple options here:
Training a model so it has access to all your data internally
This requires dedicated “provisioned access” at AWS, which is minimum $30k/month, which is a little beyond my price point
Establishing a “knowledge base” which runs OpenSearch on the back-end, and can be queried to provide “vectors” (which are really snippets of information) to your bot so it can be more informed
This should cost a few hundred dollars a month, which is significant, but not compared with Confluence AI, which is ~$3.53/month/user, so for 1.5k users, that’s $63k/yr!
This is an early feature from AWS, and it’s not very efficient yet. You pay for DB units, and so it’s costing ~$2k/month. That’s still less than 40% what Confluence AI costs, but it’s a significant investment! FYI in case you don’t have a corp picking up the bill here
We don’t want to pay $30k/month to train our model on any particular knowledge. We’d rather just fetch relevant information at runtime. That doesn’t sound very amazing, but check out some examples of what it can do.
Example 1 - When provided with some terraform to validate, it found that a) the terraform is entirely valid and logical except b) it checked the IPs referenced in the confluence vector DB, and found that one of them was inaccurate
Good luck getting a human to notice something like that, but Vera found it in a few seconds and event provided a fixed version.

Example 2: Sometimes it’s hard to know who to talk to. When asked for the name of an internal team, it found a Confluence wiki that had all the members, and provided all of them grouped by function.
Having an AI that understands your Org chart (if you keep that somewhere in Confluence) can be really helpful for who to ask to unstick stuck projects, or know who the expert on a particular topic is.

Without further ado, lets dig into how we implement this. First stop, lets read the entire Confluence and store it in OpenSearch with a Bedrock Knowledge Base.
Generate an API Token for Confluence
We’ll need a few things when we create our knowledge base - the first thing is a Secret that’s a Confluence API Token with the appropriate permissions, namely read:* everything, and `offline_access`.
Keep in mind that the data imported via this connection will be EVERYTHING this API Token’s user has access to. If you are a Confluence Admin with access to everything, and you create an API Token with access to everything, your bot will ingest ALL the pages, which might include some secret pages. Be cautious here!
A great idea is to create a service user that has no special access, and can only read the default pages that everybody gets access to. That’s what you’ll want your bot to represent anyway, right?
Okay, so log into Confluence as that bot to this page:
Click on Create API token to get started.

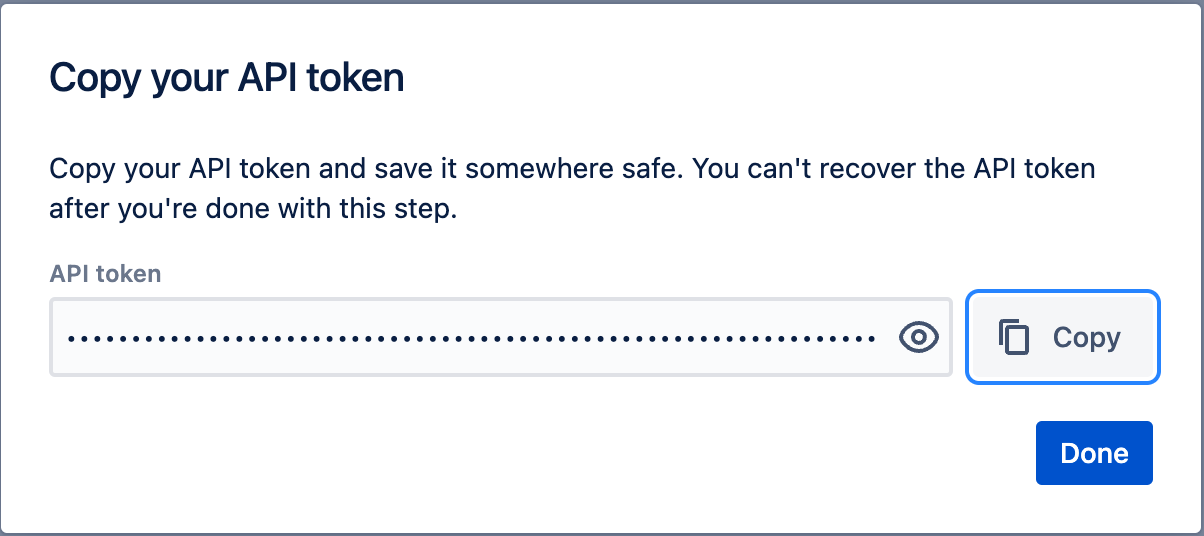
Name your token and set an expires-on date. Note that you can set an expiration date up to a year out, and you’ll need to regenerate this token before then.
Mark your calendar for when this token will expire!

Copy the API token to a secure storage area, we’ll use it shortly.
Store the Secret
Next up, lets store this as a secret we can fetch from Bedrock when we run the sync process. Head over to the Secrets Manager console page and click on Store a new secret.

Choose the “Other type of secret”. Make sure the keys are exactly:
“username” (no quotes, lower-cased) - should be the email address of the user we’ll use to sync Confluence data.
“password” (no quotes, lower-cased) - should be the API token we generated earlier.
Make sure the keys (username, password) are lower-cased. I tried upper-cased at first and they didn’t work. The values (your email address and API token) can have capitals, but match the proper values to work.

Name your secret. Note that the name must start with AmazonBedrock and then can have anything following it.

Click on Next —> Next —> Store and you’ll see your secret ready to go.
Click into the secret and copy the Secret ARN to a note. We’ll use it shortly.

Enabling the Embedding Models
We’ll need to use an embeddings model to convert the raw data in Confluence over to sane vectors in our OpenSearch resource. Embeddings models are purpose built for this purpose, and are different from the general purpose or “conversational” AIs.
To do that, we’ll need to enable the particular embeddings model we’ll use: Titan Text Embeddings v2
First, go to the Amazon Bedrock console page in the region you’ll be doing your sync (I recommend us-west-2) and click on Providers.

This embeddings model is provided by Amazon, so click on that provider.

The default UI for this page isn’t great, so click on the hamburger menu in the top right to change it to a list view so you can see the full names of each model.

Find “Titan Text Embeddings V2” in the list. I already have access, but you’ll likely have “Available to Request”.
If you see “Access granted”, skip to the next section, you already have access.
Click on “Available to request” and then on Request model access.

You’re taken to the “request access” page, where you need to make sure the box next to “Titan Text Embeddings V2” is checked. I’m unable to check it in the screenshot because I already have access, so I’ll request Titan Multimodal Embeddings G1.
Click on Next in the bottom right.

You’ll see a summary page of what you’re requesting. Click on Submit.

After a few minutes, you’ll now have access to this embeddings model.
Creating an S3 Bucket for MultiModal Data
Next up, we’ll create an S3 bucket for multimodal data.
Note that as of writing, multi-modal data is not yet supported. I’m including this step because I hope that multi-modal data will become supported in the near future, and adding an S3 bucket isn’t yet supported - it requires recreating the knowledge base, which would delete all the data.
Head over to the S3 panel in the console and click on “Create bucket”.

Leave the type as General purpose, and name your bucket. Bucket names are in a global namespace within the region they’re created, so use something unique to your organization for the name.

Leave all other settings the same (feel free to add tags for ownership!) and click Create bucket.

Within a few seconds, you now have a file storage location for bedrock to use to cache binaries.
Read Confluence, Store Vectors
The first step to using the knowledge in Confluence is to have Bedrock read that data into OpenSearch. This feature is currently in Preview/Beta, so it isn’t yet supported by Terraform unfortunately. We’ll stick to lots of screenshots - hopefully the structure of the web pages doesn’t change too much between when I take them and when you read it - we’ll see!
Head over to Bedrock in the console, and find Knowledge Bases under Builder tools.

Click on Create —> Knowledge Base with vector store.

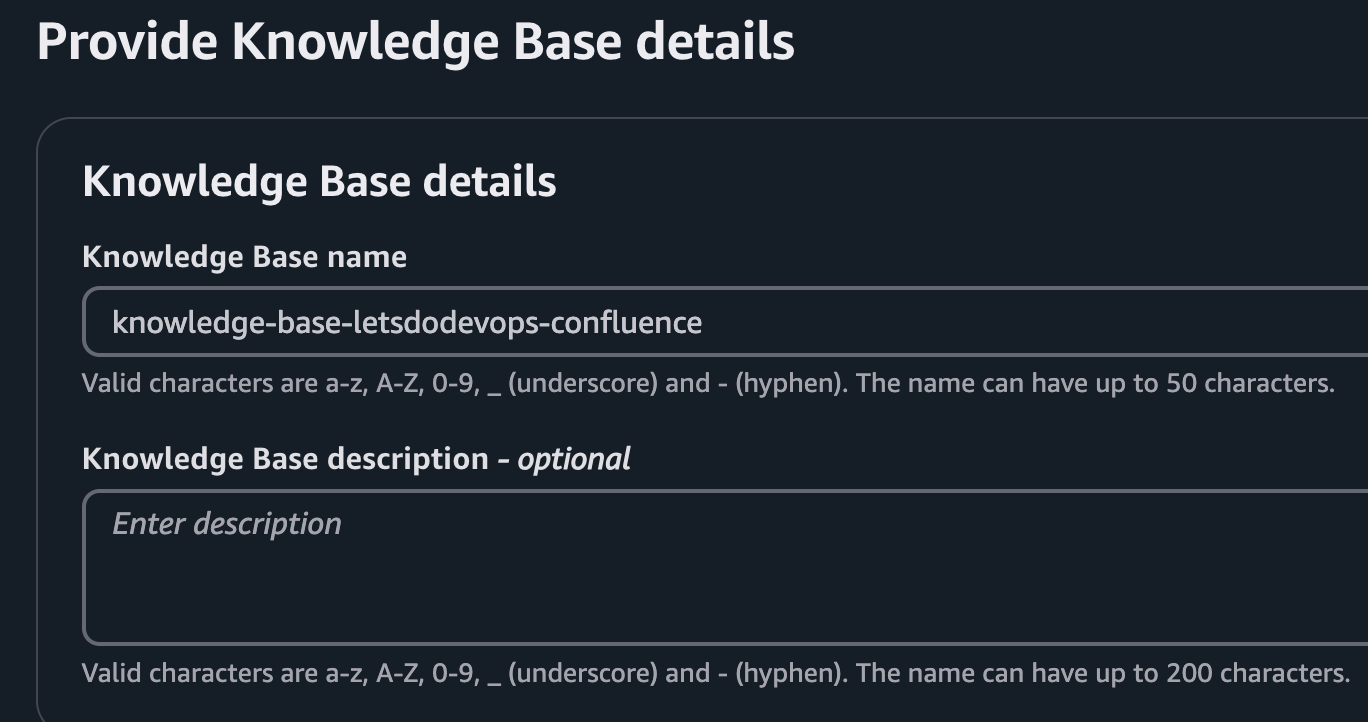
Name the knowledge base whatever you’d like. It doesn’t have to start with knowledge-base- as shown here.
Note: You cannot change this later without recreating the knowledge base, which deletes all the local data. Choose carefully.
The easiest solution here is to let the Bedrock wizard create a new IAM role and policy for you. It’ll give it permission to:
Trigger the embeddings model
Create and update the OpenSearch resources it’ll put data into
Read and write the S3 bucket for storing artifacts
Read the Secret where your username and password are stored

For type, select Confluence - Preview
Note: This data source is currently in preview at article writing time. It’s subject to change (and hopefully to become cheaper and easier to use!)

Name your data source. There can be lots of data sources within a Knowledge Base, even to the same destination. For instance, you can point lots of Data Sources at the same Confluence to sync different things at different speeds, or test new types of data.
You cannot change this name later without recreating the data source, which deletes the data. Choose carefully.

Enter your the Confluence URL.
This confluence URL is fake.

Stick with Basic Authentication, and enter the ARN of the same-region secret that stores the username and password we’ll use to sync Confluence.

Choose the non-default AWS Bedrock parser - the “Amazon Bedrock Data Automation as parser” which is currently in preview. It supports visually rich docs and images, so you’ll be able to read those when the Bedrock service supports it.
Note: You’re unable to change your embeddings model to another one after creating it, even within a family (AWS embedding models). You’ll need to destroy the synced data and create a new Data source to sync.

Next up we’re going to set some regex on what to sync. The value that we’re permitted to check against is different for the different types of data stored in confluence. This snap comes from this page.

Multi-select is supported for regex checking, and you can use a pattern like in this image to select multiple keywords. It’s a good idea to start with a really small sample size to make sure this is working. You can add keywords (or the wildcard “.*”) when you’re ready to sync more.

Enter your regex, like this, for Page.
.*(Keyword1|Keyword2|Keyword3).*
We’re also going to include a wildcard to sync all Comments since those are likely small and few.

Any type of data that isn’t filtered by an include or exclude is fully synced, which is a bit of an odd behavior. To combat that and not sync all the Blogs, and Attachments, we’ll use “Exclude pattern” wildcards for each of those types.
We’ll notably exclude any Spaces filters at all. We don’t really want to sync any spaces, but Pages belong to Spaces, and it appears both are checked for each Page evaluated for sync. That’s likely a bug in the Confluence data source, but it’s how it works today.

Next up, the embeddings model. The default will look familiar to you, leave it on the Titan Text Embeddings v2 model.

Next, we’ll create a vector database to store the computed vectors. The only currently supported one for Confluence is the Amazon OpenSearch serverless. Leave it at the default.

Next up, find the S3 bucket we created earlier. Remember, this bucket won’t likely be used for anything yet, since the Bedrock service doesn’t support multi-modal data types, but it’s coming.
If you see multi-modal support working, please let me know!

Hit Create, and after a few minutes hopefully you’ll see a header message like this at the top of your AWS console tab.

Sync the Data
Now it’s time to sync the data and see if it works!
Within the Knowledge Base we created, check the box next to the data source we want to sync and then hit “Sync” in the top right.
A sync will begin in the next few minutes.

Syncs can take a while. I find the UI of these pages to be really annoying - when you refresh, it loads side-bars and top bars and makes the data you’re looking for super tiny and hard to find, so I wrote this script to monitor the data source sync so I don’t have to refresh the page.
Here’s a link to the script I use. It only succeeds in monitoring a data sync if it’s started when the data sync is STARTING or RUNNING. If it’s already failed or succeeded, the script fails.
If you see a failure, check it out - it’s likely your username/API token are wrong, or need to be granted rights.
It’s normal for this sync process to take 5 minutes to tell you it can’t start.
Once the sync has completed, you should see something like this, that indicates the number of items added to the OpenSearch vector store for your knowledge base sync.
Note that knowledge base data sources don’t yet support any type of automation for triggering them, e.g. they don’t trigger automatically every week/day/month, and they don’t sync based on activity. Right now you have to click the button (or write a GitHub Action, which I’ll likely do until AWS supports schedules).

Sweet, we have data in our Knowledge Base / OpenSearch!
Verify data in OpenSearch
But wouldn’t it be cool to verify that the data is there? You can with an OpenSearch command using awscurl!
| > awscurl --region us-west-2 \ | |
| --service aoss \ | |
| "https://(Your open search URL).us-west-2.aoss.amazonaws.com/bedrock-knowledge-base-default-index/_search" \ | |
| -H "Content-Type: application/json" \ | |
| -d '{ | |
| "size": 0, | |
| "aggs": { | |
| "unique_urls": { | |
| "composite": { | |
| "size": 100, | |
| "sources": [ | |
| { | |
| "url": { | |
| "terms": { | |
| "field": "x-amz-bedrock-kb-source-uri.keyword" | |
| } | |
| } | |
| } | |
| ] | |
| } | |
| } | |
| } | |
| }' | jq '.aggregations.unique_urls.buckets[].key.url' | |
| "https://letsdodevops.atlassian.net/wiki/pages/Page1" | |
| "https://letsdodevops.atlassian.net/wiki/pages/Page2" | |
| "https://letsdodevops.atlassian.net/wiki/pages/Page3" |
This’ll show a list of the first 100 pages you’ve indexed.
You can also search for similar keyword matches to find vectors.
Spoiler, this is exactly what we’re going to do with our chatbot, except we’ll use Python on the boto3 API libraries, instead of awscurl.
| awscurl --region us-west-2 \ | |
| --service aoss \ | |
| "https://(Update this to your confluence URL).us-west-2.aoss.amazonaws.com/bedrock-knowledge-base-default-index/_search" \ | |
| -H "Content-Type: application/json" \ | |
| -d '{ | |
| "size": 1, | |
| "query": { | |
| "multi_match": { | |
| "query": "Keyword", | |
| "fields": ["AMAZON_BEDROCK_TEXT"] | |
| } | |
| }, | |
| "_source": [ | |
| "AMAZON_BEDROCK_TEXT", | |
| "x-amz-bedrock-kb-title", | |
| "x-amz-bedrock-kb-source-uri" | |
| ] | |
| }' | jq '.hits.hits[]' | |
| { | |
| "_index": "bedrock-knowledge-base-default-index", | |
| "_score": 15.079779, | |
| "_source": { | |
| "x-amz-bedrock-kb-source-uri": "https://letsdodevops.atlassian.net/wiki/spaces/SPACE/pages/123413241234/Page+Title", | |
| "AMAZON_BEDROCK_TEXT": "Your content here keyword" | |
| } | |
| } |
Next up, lets update our Python to talk to our knowledge base, and our IAM to permit it.
First, IAM.
IAM Permitted To Do This (Please)
We want our python lambda to talk to OpenSearch, but we do this via the Bedrock resource, so that’s what we need to write our policy against. The verb we’re going to use is called “bedrock:Retrieve”, which means to fetch vectors.
On line 15, you’ll see a verb called “bedrock:RetrieveAndGenerate” that we’ll permit also to permit future testing - that’d allow us to both fetch vectors from a knowledge base and also get a RAG plain language response.
Note that we’re targeting “*” below for the resource ID. If you want to be extra secure, add specific IDs of the knowledge bases the lambda is permitted to talk to.
| resource "aws_iam_role_policy" "DevOpsBotSlack_Bedrock" { | |
| name = "Bedrock" | |
| role = aws_iam_role.DevOpsBotRole.id | |
| policy = jsonencode( | |
| { | |
| "Version" : "2012-10-17", | |
| "Statement" : [ | |
| # Other policies excluded | |
| # Grant permissions to use knowledge bases in us-west-2 region | |
| { | |
| "Effect" : "Allow", | |
| "Action" : [ | |
| "bedrock:Retrieve", | |
| "bedrock:RetrieveAndGenerate", | |
| ], | |
| "Resource" : "arn:aws:bedrock:us-west-2:${data.aws_caller_identity.current.account_id}:knowledge-base/*" | |
| }, | |
| ] | |
| } | |
| ) | |
| } |
Python - Fetch Vectors and Add To Convo
Now this’ll be fun. When we get a request from someone who’s tagged our GenAI bot, we generate a conversation and get a response from the AI model (bedrock-hosted Claude Sonnet).
Now we have a knowledge base. You’d think we could add a parameter flag to our API request to be like “also do the knowledge base stuff” but it’s a little more complex than that. Instead, we need to:
Compile our conversation driving the request to a format compatible with the knowledge base (hint: totally different data structure than the conversational AI endpoint)
Request vectors from the knowledge base. We’ll specify a limit (in this example, 5), but if there are fewer that satisfy the thresh-hold of being related, the knowledge base will return fewer.
Iterate through those vectors and append their content and their URL source to the conversation, with notes to the AI to use this information as knowledge base information.
Send the conversation to the conversational AI as normal, get response, relay back to user
So we’re doing most of the same stuff as before, but we’re going to shim in the knowledge base stuff here.
First step - lets establish some top-level constants. You can find these in the original source here.
We add a feature flag on line 2 to turn the knowledge base on or off, for debugging and stability purposes.
Then on line 3, we set the ID of the single knowledge base we’re supporting. If you support more you’ll need some more IDs. We could fetch this ID from a name, but to save on execution time (lambda), we put the ID directly.
The on line 4, we set the number of knowledge base vectors we want to fetch. Adding more takes longer, and potentially returns lesser quality responses to your AI. Fewer might miss important information. In my testing, 5 is a good number.
Note: All the code below is written to iterate over this number so you can easily test different numbers of results, and see what works best for your Org and data.
| # Knowledge base information | |
| enable_knowledge_base = False | |
| ConfluenceKnowledgeBaseId="xxxxxxxxxx" # ID of the knowledge base | |
| knowledgeBaseContextNumberOfResults = 5 |
Next, let’s establish a new function that’ll let us ask the bedrock for vectors.
On line 4, we use our bedrock_client (established earlier, and use for the conversational AI requests also) to do a `retrieve()` on the knowledge base. That means it’ll just send us a vector json package, and we’ll have to do stuff with it (which we will, below).
On line 6, we need to send the “flat conversation” which means the whole convo embedded into a single string, to the retrieval query. We’ll talk about how we generate that more below, but for now, trust me!
On line 8, we tell it which knowledge base to ask.
And on line 9, we tell it how many results to fetch. This is the ID we defined above.
On line 17, we return the response from the knowledge base.
| # Function to retrieve info from RAG with knowledge base | |
| def ask_bedrock_llm_with_knowledge_base(flat_conversation, knowledge_base_id, bedrock_client) -> str: | |
| # uses embedding model to retrieve vectors | |
| response = bedrock_client.retrieve( | |
| retrievalQuery={ | |
| 'text': flat_conversation | |
| }, | |
| knowledgeBaseId=knowledge_base_id, | |
| retrievalConfiguration={ | |
| 'vectorSearchConfiguration': { | |
| 'numberOfResults': knowledgeBaseContextNumberOfResults, | |
| #'overrideSearchType': "HYBRID", # optional, default is the KB chooses the search type | |
| } | |
| }, | |
| ) | |
| return response |
Next up, lets head into the handle_message_event() function we’ve defined earlier. This looks up the slack threads messages, and generates the conversation data structure we’ll use to talk to our AI.
It’s all exactly the same as before to build our conversation - so our conversation looks like this:
Jo: What is a deer?
Vera: A deer is a (etc etc)
Jo: What about a porcupine?
And here we have a structured data json payload that looks like this to represent that conversation:
| [ | |
| { | |
| "role": "user", | |
| "content": [ | |
| { | |
| "type": "text", | |
| "text": "Jo says: What is a deer?" | |
| } | |
| ] | |
| }, | |
| { | |
| "role": "assistant", | |
| "content": [ | |
| { | |
| "type": "text", | |
| "text": "A deer is a (etc. etc.)" | |
| } | |
| ] | |
| }, | |
| { | |
| "role": "user", | |
| "content": [ | |
| { | |
| "type": "text", | |
| "text": "Jo says: What about a porcupine?" | |
| } | |
| ] | |
| } | |
| ] |
We’ll be going over the function from the source code you can find here.
On line 5, we check if the knowledge base is enabled. If not, we’ll send this payload to the conversational AI endpoint below, and return the response.
However, if it’s enabled, lets walk through that.
On line 12, we establish an empty array, and then we iterate over the conversation json above, and put the text content appended into a long string. The result is the flat_conversation we talked about above, that looks like this:
Jo: What is a deer? Vera: A deer is a (etc etc) Jo: What about a porcupine?The regex on line 20 bears some explanation. I was sending the above conversation to our knowledge base to fetch vectors, and found that it would only include responses that included my own name. Particularly because the speaker’s name is included multiple times, the vector selection logic heavily prioritizes responses that include your name. That’s not very sensible, so I decided to strip out the speakers, and instead hand over a flat conversation without speakers included. That regex does that, and the convo turns into:
What is a deer? A deer is a (etc etc) What about a porcupine?Then on line 26, we trigger the function we established earlier to fetch the vector responses from the knowledge base, and store it as a response variable.
| # Common function to handle both DMs and app mentions | |
| def handle_message_event(client, body, say, bedrock_client, app, token, registered_bot_id): | |
| # ... Other items excluded above | |
| # If enabled, fetch the confluence context from the knowledge base | |
| if enable_knowledge_base: | |
| print("🚀 Knowledge base enabled, fetching citations") | |
| if os.environ.get("VERA_DEBUG", "False") == "True": | |
| print("🚀 State of conversation before AI request:", conversation) | |
| # Flatten the conversation into one string | |
| flat_conversation = [] | |
| for item in conversation: | |
| for content in item['content']: | |
| if content['type'] == 'text': | |
| flat_conversation.append(content['text']) | |
| flat_conversation = '\n'.join(flat_conversation) | |
| # On each conversation line, remove all text before the first colon. It appears the names and pronouns really throw off our context quality | |
| flat_conversation = re.sub(r".*: ", "", flat_conversation) | |
| if os.environ.get("VERA_DEBUG", "False") == "True": | |
| print(f"🚀 Flat conversation: {flat_conversation}") | |
| # Get context data from the knowledge base | |
| knowledge_base_response = ask_bedrock_llm_with_knowledge_base(flat_conversation, ConfluenceKnowledgeBaseId, bedrock_client) |
Continuing from above (because it got LONG!), we then iterate over the responses that were retrieved from the knowledge base on line 5.
We store two data points above each response, both of which are important for different reasons:
The result on line 6. That’s the text vector response that includes the text our AI is going to read to generate a response. That’s critical stuff, obviously we need it
On line 7, we store the URL of the response. In our knowledge base, every vector is stored with metadata, which includes the URL of the page where the data was fetched from. By passing that information to our AI, we can request that it includes that information in every response it provides us, to tell us what is the page (and link!) to our proprietary data store it used to generate its response.
This is a huge part of helping humans combat AI model hallucinations - the humans can pretty readily verify the page link seems to relate to their question, and if they are suspicious, go read the source to validate the information.
Then on line 10, we append to the conversation the knowledge base. There’s no special “role” key for knowledge base information, so we tag it as a “user” on line 12, and add instructions on line 16 that this is a knowledge base citation with a text result, as well as a URL where the information comes from.
Note: I made this up, no idea how standard of an idea this is. However, I can tell you it appears to be readily understood by the model, and it helpfully returns the information to us that we need, as well as the citation.
| if os.environ.get("VERA_DEBUG", "False") == "True": | |
| print(f"🚀 Knowledge base response: {knowledge_base_response}") | |
| # Iterate through responses | |
| for result in knowledge_base_response["retrievalResults"]: | |
| citation_result = result['content']['text'] | |
| citation_url = result['location']['confluenceLocation']['url'] | |
| # Append to conversation | |
| conversation.append( | |
| { | |
| "role": "user", | |
| "content": [ | |
| { | |
| "type": "text", | |
| "text": f"Knowledge base citation to supplement your answer: {citation_result} from URL {citation_url}", | |
| } | |
| ], | |
| } | |
| ) |
But why does it include a citation in its response? Well, because we told it to.
We’ll go over the system prompt you can find here.
All of the model_guidance below we built in earlier articles, but the instruction on line 7 has an additional instruction. It says when we’re providing information from the Confluence knowledge base, *always* include a citation link.
If you don’t include this note, the conversational AI will read the knowledge base information, but not include a URL because it hasn’t been trained to do so. You have to ask for that special behavior.
| # Model guidance, shimmed into each conversation as instructions for the model | |
| model_guidance = """Assistant is a large language model trained to provide the best possible experience for developers and operations teams. | |
| Assistant is designed to provide accurate and helpful responses to a wide range of questions. | |
| Assistant answers should be short and to the point, usually less than 100 words and should be relevant to the user's question. | |
| Assistant should follow Slack's best practices for formatting messages. | |
| Assistant should address the user by name. | |
| Assistant should always provide a Confluence citation link when providing information from the knowledge base. | |
| """ |
Test and Debug
And that’s it! Push your code and see if it works!
If you have any issues, you can enable Debugging in the Lambda console by setting an Environmental variable. Note that these variables aren’t used until you publish a new version, so:
Add the variable with value “True”
Publish a new version
Update the Alias of “Latest” (the one the Function URL uses) to point at the latest version you just published.
Test again! The logs should have WAY more information now.

Summary
In this article we went over how to generate an API token for Confluence, and store it as a secret. We requested and enabled an embeddings model we used to generate vectors from confluence. We built a knowledge base and data source, which built an OpenSearch serverless instance to store the data.
Then we ran our sync, and validated that items were added to the database, both with Knowledge Base metrics as well as with awscurl commands to the OpenSearch URL.
Then we updated our Lambda IAM policy to permit it to retrieve vectors from the bedrock knowledge base, and THEN we updated our python to shim in the logic to talk to the knowledge base - by constructing the flat conversation we require, stripped out the speaking parties and pronouns (because it confuses the vector keyword relational search), and then we iterate through the vectors to add them to the Conversation we send to the conversational AI.
All told, we built an entire RAG process for Confluence using AWS Bedrock tools, then enabled its use with Python. We rule.
Good luck out there.
kyler