
🔥Building a Slack Bot with AI Capabilities - From Scratch! Part 1: Slack App and Events🔥
aka, "can an AI do my work for me please?"

This blog series focuses on presenting complex DevOps projects as simple and approachable via plain language and lots of pictures. You can do it!
These articles are supported by readers, please consider subscribing to support me writing more of these articles <3 :)
This article is part of a series of articles, because 1 article would be absolutely massive with all parts.
Part 1 (this article): Covers how to build a slack bot in websocket mode
Part 4: How to convert your local script to an event-driven serverless, cloud-based app in AWS Lambda
Part 7: Streaming token responses from AWS Bedrock to your AI Slack bot using converse_stream()
Part 8: ReRanking knowledge base responses to improve AI model response efficacy
Part 9: Adding a Lambda Receiver tier to reduce cost and improve Slack response time
Hey all!
I have been chatting with AIs daily - GitHub Copilot is fantastic for writing code, and ChatGPT is great for initial ideas (and therapy?!) and writing things from templates, like a lot of my “there is a new post” on LinkedIn. Sure, they hallucinate sometimes, but most of the information I get from them are fantastic.

However, at work, we are banned from using general purpose AIs. We’re in the healthcare space, so uploading any data to ChatGPT is not only out of compliance, it could be criminally illegal. So that’s a bit scary.
However, AI is powerful. I want to bring it in house!
In this walk-through we’ll build a Slack App that we’ll run locally on our computer in socket mode, and when folks message it, it’ll relay that question to GitHub models, which is using AWS Bedrock general intelligence, to respond. The response is posted right into slack in whichever room the request came from!

This will be part of a series where we build out a general intelligence AI bot that can integrate with other data stores, customizations, and help contextualize messages in slack.
Primarily, I want to build a generally intelligent bot that can assist folks with understanding logs, contextualizing any information across the slack instance. In the future, I plan to add other data sources for additional contextualization of logs, and working towards automating some of the DevOps and SRE functions at work.
Lets go build it!
Create a Slack App
In order for us to send messages to a slack bot, we need to connect to slack. The first step is to build a Slack App that can watch for tags in slack, and relay the messages to us.
Navigate to this page and click on "Create New App”.

We’re going to walk through doing this from scratch so we can learn the steps, and options. However, if you want “speed mode”, you can deploy from a Manifest.
You can use this manifest to deploy. Make sure to customize the app name (if you’d like)

Choose a name for your App. It only has to be unique in your own App library, unless you plan to deploy the app to the Slack Marketplace.
Select the workspace your app will live in.
You can’t change this workspace later! So make sure you’ve selected your work’s slack for where you’re going to develop your app
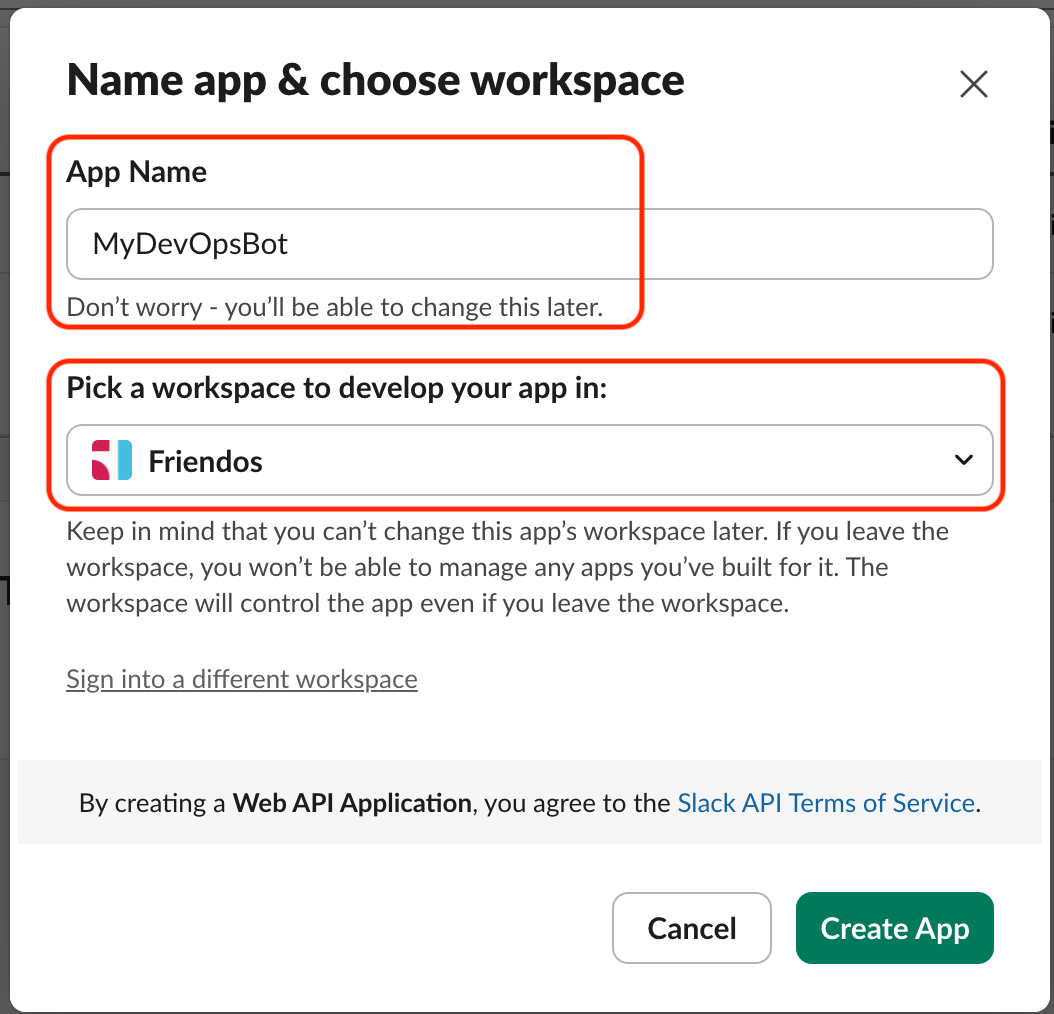
Hit “Create App”, and boom, we have a Slack app.
You can also configure your Slack App to have a specific name, description, and app icon, and background color. And you should do that! But I’ll skip that step here because I just want to get it working for now.

However, we’re not done. We have to configure it to DO stuff!
App Token
Scroll down on the home tab, and find the App-Level Tokens window. Click on Generate Tokens and Scopes to start the creation of a new App Token.

Give your new token a name. This is just for you to keep track of it, not for any other reason. Also, select a token purpose - we’re going to setup our app with websockets, a great way to get a small-ish app going, so select scope connections:write. Then click Generate in the bottom right.

Your token is displayed! It won’t be shown again (but you can always create more in the future), so make sure to copy it down somewhere secure.

Socket Mode
Next up, lets turn on Socket Mode. This lets our app connect to slack and establish a bidirectional connection. Navigate to Socket Mode in the sidebar.
We’ll probably convert this bot to be event-driven via AWS Lambda or Azure Function in the future, but socket mode is excellent for testing.

And then find the Connect using Socket Mode radio button, and flip it over to On.

OAuth & Permissions
Now, we need to configure the permissions that we’re going to ask for when folks install this app into their workspace.
Head over to OAuth & Permissions.

From here, scroll down to Scopes, and click on Add an OAuth Scope.

By default, Slack apps don’t have any permissions. So let’s add some.
app_mentions:read: Lets the bot read the message that directly mentioned the bot.
channels:history: Read contextual messages in a channel the bot has been added to.
chat:write: Send messages as the bot name.
groups:history: When invited to a private group, be able to read the history.
im:history: When added to a private DM, be able to read historical messages.
im:read: Read context information about DMs the bot has been added to.
links:read: Read links in messages the bot is able to read.

Event Subscriptions
Now, we’ve given permission for the Bot to do stuff, but we haven’t set any “triggers” for when the bot should be sent a message. Generally your websocket connection or serverless trigger will need to respond to an event, like when someone tags the bot. So let’s turn that on.

Enable Events.

Now let’s turn on a few events. There are a lot here that we don’t care about, like “renaming a room”, not useful to us at all. However, these are:
app_mention - When someone tags your Bot, with “@YourBotName”, either in private or public rooms, trigger an event.
message.im - When someone messages your bot (without tagging it), trigger the event.
These two are intended to be the easiest method for a human to talk to your Bot. It’s also pretty limited on purpose - you don’t want the Bot to respond to every message in a thread it’s on - it’d interrupt conversations between others. So basically, let someone directly summon the Bot, or we’ll be quiet.

Make sure to save!
Permit DM this Bot - Once More, With Feeling
Slack is *really* protective of you messaging this bot directly, so there’s one more check box to make sure you actually, for really, super seriously, want to permit users to message your bot.
Head over to App Home.

Scroll down under “Show Tabs” and turn on “Allow users to send slack commands and messages from the messages tab”.
This will permit your users to message the Bot.
If you’re unable to check this box, make sure you’ve saved your OAuth permissions with one of the “im:*” permissions, or you’ll be unable to check this box.

Install The App in Your Workspace
Your App is not yet installed in your workspace - you’ve configured the app, but not yet “installed it”, which basically means to activate it. So let’s go do that.
First, head to Settings —> Install App, and click on “Install to YourSlackName”.

You’ll see a permissions interstitial where your app is requesting the permissions you’ve configured it to ask for. Click Allow to grant your app those permissions.

You’ll be provided with a “Bot User OAuth Token”, which you’ll require. Copy this down to somewhere secure.

Test it Out
We’ve built and installed a Slack app in our workspace! Now let’s do a super basic test. We’ll go way more into depth on this topic in the next part of this article series.
If these steps don’t make any sense, that’s okay. We’ll go into depth on each of these steps in the next article in this series.
First, lets get python ready. You need at least python 3.6.
Install python3
Then activate a virtual environment.
source ./bin/activate
Then we’ll install the library we need:
python3 -m pip install slack_sdk
Then we’ll create a super bare-bones script to check if our slack app is working:
| # Works | |
| import os | |
| import logging | |
| from slack_sdk import WebClient | |
| #logging.basicConfig(level=logging.DEBUG) | |
| client = WebClient(token=os.environ["SLACK_BOT_TOKEN"]) | |
| res = client.api_test() | |
| print(res) |
Next, export the bot token as an environmental variable we can scoop up when we run:
export SLACK_BOT_TOKEN=xoxb-34…arOa
Next, let’s run it:
python3 python_slack_app_validation.py
If you see this “ok” status, you’re golden. We’re ready to move onto the next step - setting up our AWS Bedrock AI resource, deploying a model, and writing our stitch together python script.

Summary
This article series is going to be huge! To combat that, we only covered a part of this project. In this article, we start with our Slack App - we created it, named it, and gave it all the configuration and permissions it’ll require to listen to conversations where it’ll be mentioned - both with an “@MyBot” tag, and with a direct message in your slack tenant.
We enabled websocket mode, which is wonderful for locally testing our slack bot and other configuration. However, it’s not a great fit for enterprise deployment, or deploying at scale - if we used websocket mode, we’d have to manage icky compute resources 🤢.
In the next article in this series, we’ll deploy an AWS Bedrock AI resource to AWS, then deploy a model to it. Then we’ll write some python and stitch our Slack App to our Claude AI instance. This will let our slack app start working, and responding to inquiries with AI responses! Which is super rad.
In part 3 of this series, we’ll convert it all to an event-based architecture.
All coming soon. If you want to contribute to my coffee fund (which goes a great deal towards encouraging me to write more), please subscribe to this newsletter.
Thanks ya’ll. Good luck out there.
kyler
just stumbled across your interview on vbrownbag and just loving the content on the blog, especially this guide! just working my way through the posts, learning tons along the way!